

Merry Halloween, one and all! I’m Madeleine Swann, queen (or at least princess, or maybe footman) of weird stories and amateur Halloween projects. I trust you’ll be making unholy Christmas decorations with everything you learn in this post and sending me pictures. Find the original entry on my blog here and then stalk me on my twitter.
I’ve started doing a project for my blog each Halloween and this year I decided to make a diorama of an Apartment Block of Horror (cue scary laughter). For anyone wishing to gaze on their own wondrously disturbing creations, I shall tell you a little bit about how it was made.
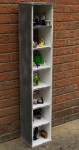
 1. I found a shelfing unit in a charity shop and rubbed it with sandpaper to make paint cling to it more easily.
2. I covered the whole thing in white primer (in case you aren’t sure, it’s paint used as an undercoat) then again with regular white house paint. I found a concrete spray for the outside in an arts and crafts shop.
3. I pencilled in the room sizes on the back board before removing it and pasting a different square of wrapping paper in each section for the wallpaper. I stuck it down with Spray Mount which gives it a much smoother finish than normal glue.
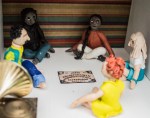
4. I made the Cthulhu head, a shadowy figure and sleeping child out of moulding clay. They need to be left in a warm place (in a box to avoid foot related mishaps) for a few days so they can dry. Then I painted them.
5. I wish I could take credit for the beautiful human (and dog) figures but I can’t. However, I did write a list of what I wanted, so that’s something I suppose. Here’s what Christine Purnell told me about how to make them: “They were made with Fimo Classic and it was the first time I’d used it so there were a few learning curves for me. It needs conditioning (plenty of kneading) before use to make it pliable, otherwise it’s stiff and crumbly and even if you managed to work it it would crack.
I bought several colours which was just as well, as they didn’t mix very well to form new colours. You can then form them into shapes and join them together, but they are a bit delicate at that stage and need careful handling.
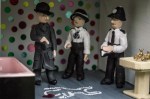
I found it best to shape the bodies and limbs, keeping all parts separate, and then use a pasta machine to roll out thin sheets to cut out the clothes and shape them around the figures, at the same time attaching and posing the limbs. Heads were attached with a bit of a cocktail stick and hair made with a spaghetti attachment.
Finally they were baked for 30 minutes at 110 °C (230 °F). Apparently larger pieces can be sanded but mine were too small.
6. Finally I added the ouija board, candles and skulls which I bought from ebay (links are on my blog). There are plenty of amazing miniature makers out there and if, like me, you’re all fingers and thumbs when it comes to fiddly details I suggest you have a look at what they can do.
I also painted the top room grey as the chalk wouldn’t have stood out otherwise. The blood is just red pen.
And there we have it, The Apartment Block of Horror. I’d be careful before renting a room there if I were you.

Categories: Crafts and DIY
 Captain Hook’s Hand and Other Delightful DIY Halloween Props
  Idle Hands are the Devil’s Playground: DIY Glass Etching
  The Spell of the Dead Man’s Hand: DIY Hand of Glory Candle Prop
  Carving Flesh: Sculpted Watermelons by Clive Cooper
I love this. Such a cute little collection of clay deviants!